How to Install ATV LED Lights
As with everything when it comes to modding quads, you have many options for adding LED lights.
- Single LED lamps – powerful lamps to supplement the ATV’s headlights
- Amber LED bars – punch through fog at night
- Micro-pod work-lights – smaller LEDs to complement your light bar
- LED whip lights – bright, often colorful lights that make your ATV highly visible to others
- Light bar – a strip of LEDs powerful enough to light up the night
The choice(s) you make fr om the LED light options will reflect the riding you do, though virtually every ATV use can do with a bit more light shed on the situation.
PRE-INSTALLATION CHECKLIST

Before you buy your LED light(s), there are several considerations:
Legality – States often have laws on the use of LED lights. This is particularly important if you plan to ride your ATV/UTV on public roads. You’ll often be able to use an LED light bar off-road, but you won’t be able to use it on-road.
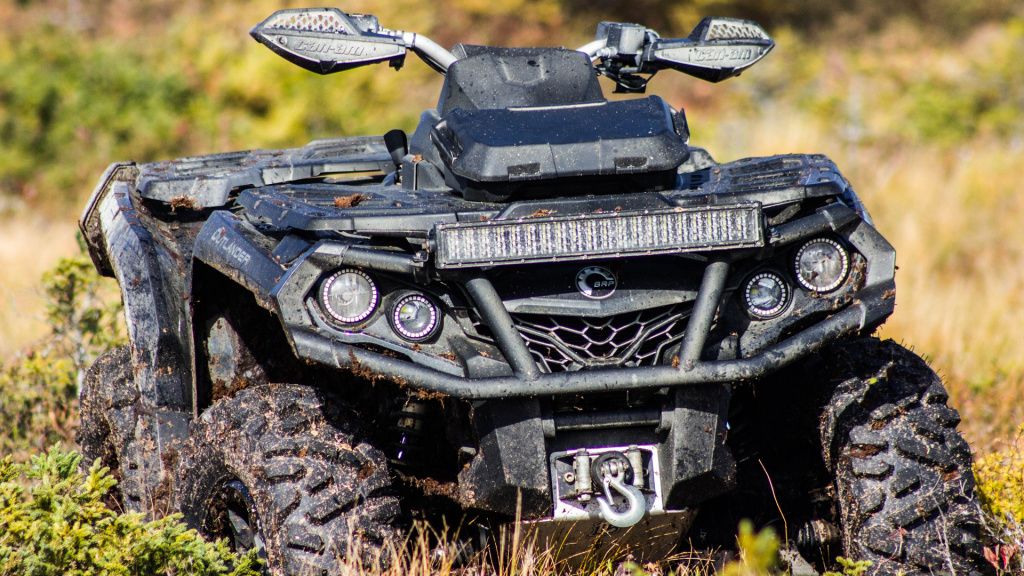
Positioning – You need to have adequate space on your quad for the LED lights you will install. With light bars, you want them to be mounted relatively high so that the light beam can spread. Ideally, mount the light bar behind a bar, so it’s protected from impact. Bull guards often have spacing for light bars with mounting spots already in place. If there is no dedicated mounting spot, search for ‘LED bar mount’ with your ATV’s make and model to see which mounts are available.
Features – Consider the lifespan, cooling, shape, and durability of the best LED lights on the market.
Light color – LED lights with lumens of 3000K or lower will be yellowish-white. Lights between 3000K and 6500K will be much whiter. We recommend around 5000K unless you have a particular style in mind.
Beam pattern – Light bars can be either narrow beam, floodlight, or a combination of both. Narrow beam spotlights are better for fast riding as the light is thrown further. Floodlights are more convenient at lower speeds as the light is spread wider.
INSTALLING AN LED LIGHT WITH A WIRING HARNESS
1. You will need a wiring harness. Some LED lights are supplied with a harness, but not all.
2. Locate a suitable section to mount the LED light that will allow the wires to reach it. If required, drill appropriate holes.
3. Mount the light with the supplied hardware or mounting brackets.
4. Don’t connect the wiring to the battery yet. From the battery, route the lighting side of the wiring harness through the quad. Avoid heat sources and moving parts. Following the manufacturer’s wiring harness path is a good choice.
5. Connect the light to the harness.
6. Now, route the switch side of the harness to where you want the switch to be. You may need first to unplug the switch to get access to the optimal location. Some LED lights come with remote switches for simplicity.
7. Drill a hole for the switch or attach it via a supplied mounting bracket.
8. Connect the black wire of the wiring harness to the black (negative) terminal of the battery.
9. Connect the red wire of the wiring harness to the red (positive) terminal of the battery.
10. Test the lighting circuit works.
11. Secure the relay to a suitable, safe location on the quad.
12. Tighten all the mounting hardware after ensuring the light is focused in the right direction.
INSTALLING AN LED LIGHT WITHOUT A WIRING HARNESS
1. You will need a pigtail adaptor.
2. Locate a suitable section to mount the LED light that will allow the wires to reach it. If required, drill appropriate holes.
3. Mount the light with the supplied hardware or mounting brackets.
4. Don’t connect up the wiring to the battery yet. Route all wiring from the battery to the light.
5. Connect the pigtail adaptor to the light bar. <
6. Route the black wire from the battery to the black wire of the pigtail adaptor.
7. Run the red wire from the battery to the positive/red/input terminal of the switch.
8. Drill a hole for the switch or attach it via a supplied mounting bracket.
9. Connect the black wire to the black (negative) terminal of the battery.
10. Connect the red wire to the red (positive) terminal of the battery.
11. Test the lighting circuit works.
12. Tighten all the mounting hardware after ensuring the light is focused in the right direction.


