How to Fix Common ATV Axle Problems
Your ATX axles do a lot of important work. They’re the last link in the chain fr om getting the engine’s power to the ground. They’re also subject to a lot of torque and can have issues with binding and heating, particularly if you install a high lift kit on your ride.
WHY DO LIFT KITS CAUSE ATV ISSUES?

The stock axles your ATV comes with are designed for stock applications. Small lift kits (those about four inches deep or less) usually rely on the stock axles despite putting a lot more pressure on them.
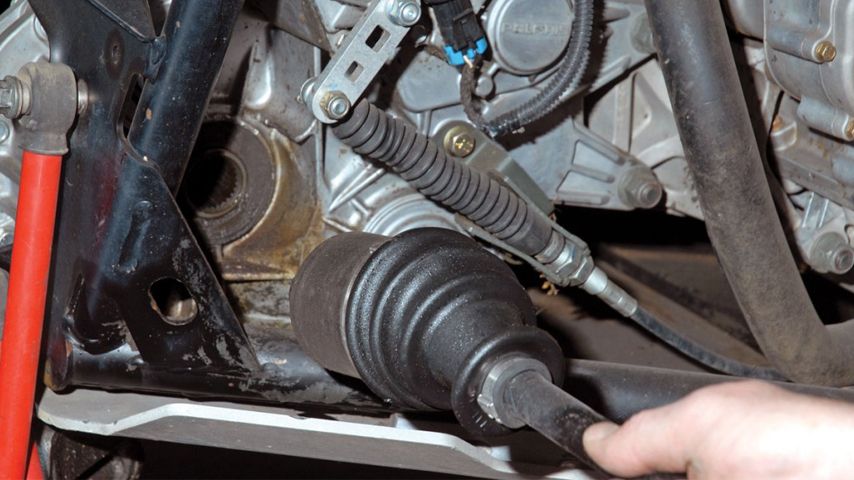
When you lift an ATV, the angles of the axles’ CV joints are steeper. This causes overheating CV joints. Higher heat means the grease in the CV joint can break down, so it no longer lubricates properly. As you can expect, this causes wear-and-tear on the CV components, and they’ll fail over time. Sometimes, when the heat is so high, the pressure bursts the rubber in the boot or melts it completely, resulting in an instant blowout.
Another issue can be axle binding, where the internal bearings lock hard because the CV joint has bent too far. When you accelerate fast when the bearings are in this state or go over uneven terrain at speed, you can cause the CV joint to explode internally.
Bigger lift kits usually come with extended axles, which solves the above issues as the axle angles are no longer so steep. However, they have their own issues. Big lift kits are usually paired with transmission gear reductions and huge tires, which put extra torque load on the axles. You can experience shattered cages and boots when the axles can’t handle the additional weight and force.
MINIMIZING LIFT KIT AXLE PROBLEMS

If you add a big lift kit, ride carefully. Your ATV might be able to get across more challenging terrain, but its newfound power in one area means it’s weaker in another. Don’t gun it, especially when your wheels are wedged. Use a steering stop kit to ensure you don’t use power when your wheels are at a dangerous angle for your axles. And use heavy-duty lift kits with axles that are designed to take the extra heat of the punishment you’ll put them through.
REPLACING A DAMAGED ATV AXLE
Though it’s sometimes possible to straighten a bent ATV axle, it’s a professional shop job. Most of the time, broken axles will simply be replaced in their entirety.
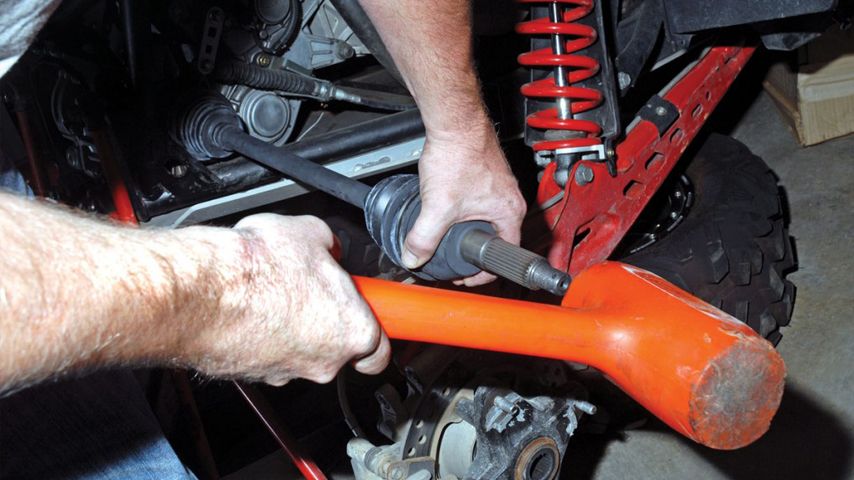
The main tools you’ll need are a rubber mallet, socket wrench kit, needle-nose pliers, and torque wrench.
Removing the old ATV axle

1. Put the ATV into park and use a jack to raise it off the ground. Secure the ATV.
2. Take off the lug nuts of the wheel and remove the wheel.
3. Take off the castle nut and cap, if there is one.
4. Take off the cotter pin with needle-nose pliers.
5. Loosen the nut with a socket wrench and remove any washers.
6. Take off the brake caliper and fasten it out of the way with a zip tie. You don’t need to remove the brake hose.
7. Remove the hub.
8. At the bearing carrier, free the upper steering knuckle joint. Check your service manual for any special instructions.
9. From the housing, Pull the axle out at a straight angle. It should come out with manual force; a few jerks while someone else holds the ATV in place. If it doesn’t come loose, try spraying in some penetrating lubricants.
Installing the new ATV axle

Reverse the steps above.
1. Clean the casing seal face with contact cleaner, ensuring none gets inside.
2. Add grease to the inner splines.
3. Ins ert the new axle in to the casing.
4. Drive the axle in to place. A few hits with the rubber mallet should do the trick. You’ll hear it click into place.
5. Through the hub, thread the outer joint.
6. Underneath the carrier assembly, place a jack.
7. Fit the knuckle back on the upper arm.
8. Install the hub onto the knuckle.
9. Onto the rotor, reinstall the brake caliper.
10. Reinstall the washer, castle nut, and cotter pin. 11. Reinstall the tire and lug nuts.

